How to Create a Group in Gmail in 3 Steps

September 3, 2025

When it comes to organizing your workflow, there are many ways you can help simplify your daily routine. Whether that be creating separate folders on your desktop for different tasks, having a calendar in place so that you don’t miss any deadlines, or making a quick to-do list, these practices have all been proven to increase productivity, time management, and have a better work-life balance.
One major pain point for many people when it comes to working is email management. The reason being, it can be hard to keep track of the emails you need to review and who you need to reply to. Luckily, that’s where Gmail’s helpful group feature comes into play.
As part of Google’s suite of workflow tools, creating a group in Gmail allows you to send out your messages at once. This feature also helps you to have a more organized inbox since your recipients can directly respond to the same communication instead of creating separate replies. With Gmail’s group email feature, you’ll be able to save time in keeping track of your emails and manage your inbox better. Check out how you can turn on this feature below in just three steps.
1. Go to Your Google Contacts
To access the contacts you already have saved, start by logging into your Gmail account. Then, navigate to the dotted grid on the upper right-hand side of the screen. This grid is situated near the left corner of your account’s profile symbol, which is usually either the first initial of the name you have saved on your Google account or a profile picture if you added one.
Next, click the grid, and a dropdown of all of Google’s tools will appear. Scroll through the list until you see an icon that says ‘‘Contacts,’’ which looks like a blue symbol that resembles a person. Then, click the icon, and your Google’s contacts screen will appear.
2. Add and Select Your Contacts
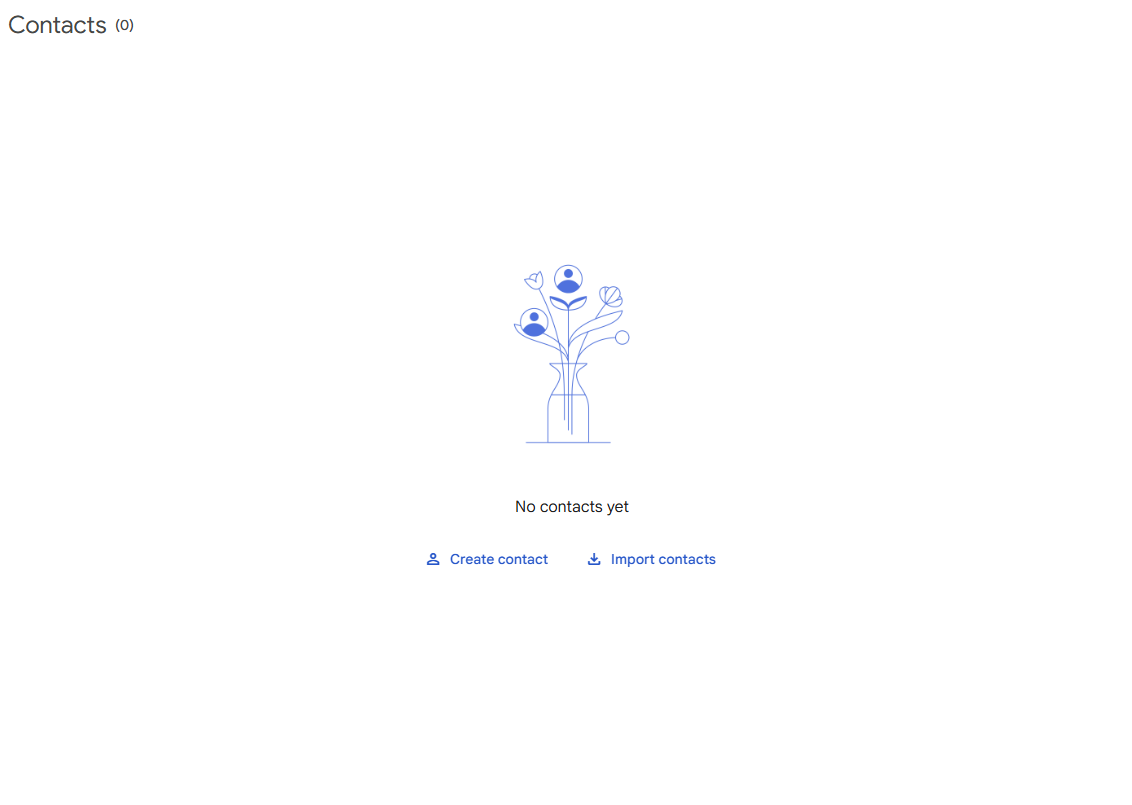
Now that you’re on the right screen, take some time to review the contacts you want to add to your Google group. You can do this by scrolling down and reviewing the information you already have saved for each contact before selecting them. If this is your first time using Google’s contact feature, you’ll need to add the information of each person first before choosing your group’s contacts.
You can add new contacts by selecting the ‘Create Contact’ button that’s in the middle of the screen. From there, you’ll be directed to a new screen where you can add the person’s information, including their first and last name, their email and phone number, along with the company they work for, as well as their job title if applicable. When you’re done adding your new contacts, click ‘Save’ and then head back to the main contacts screen.

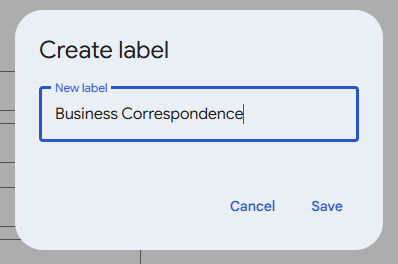
Once you’re back at the main page, click on the plus (+) sign next to the tab that says ‘Labels,’ which is located in the menu dropdown on the left-hand side of the screen. After clicking the plus symbol, another screen will appear, and prompt you to create a new label. You can title your label based on the subject matter of your email. Make sure to keep it clear and concise, and use any punctuation or symbols, such as a colon or underscore if needed.
3. Save Your Label and Send
After you’ve titled your label, click save, and the labels screen will close automatically. Now that your label is saved, review your contacts list, and select the checkmark box next to each one you want to include in your group. Then, head over to the ‘Manage Labels’ tab, which looks like a tag icon, that’s located on the right side of the screen next to an envelope symbol. Select the tab, and a dropdown menu that shows your label(s) will appear. Click on the one you want to use and then click ‘Apply,’ which will automatically save your added contacts to your new group.

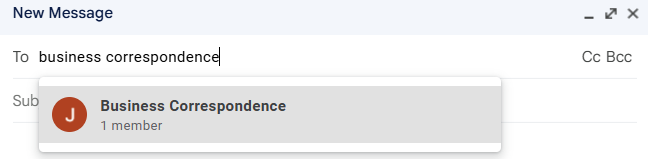
Now that you’ve created your new group, head back to the homepage of your Gmail account and click ‘Compose’ to draft a new email. Once you’re done writing it, type in the name of your group in the ‘To’ section of the email. As you start typing, the name of your group will automatically appear. Click on its name or hit the ‘Enter’ key on your computer, so that it saves in the ‘To’ section. Then, double-check that everything in your email is correct, and click send.
What to Remember
Here are some additional tips to keep in mind when creating your new Gmail group. First, when going to your contacts list, take the time to look at all the information for the people you have saved, and make sure that it’s accurate and up-to-date. That way, your message doesn’t bounce back from someone who’s supposed to receive it because their email address is incorrect.
You also want to make sure that each label name is easy to read and understand so that you can reference it later. Creating an easily readable label is also helpful when you want to create separate labels for different contacts so that they’re all simple to review and edit.
Lastly, when sending your email with your new group label, you can use the CC or BCC fields depending on who you want to see your email. Using the CC option, similar to ‘To,’ allows everyone who’s included in the group to see each other’s email addresses. Alternatively, using BCC means that those in the group aren’t able to see each other’s emails, which is most commonly used for privacy reasons.
Take a look at our news on Business Technology