How To Create Gmail Email Rules for Better Organization

September 5, 2025

Managing your email inbox can be overwhelming and time-consuming. But by organizing it regularly, you’ll be able to better oversee all your incoming and outgoing mail. And thanks to helpful tools like Gmail’s email rules filter, you can better manage and keep track of your messages without spending a lot of time organizing your inbox.
With this feature, Gmail allows you to stay on top of your inbox by allowing you to create a specific criterion or ‘rule’ that automates how you receive your mail. Based on what you choose, with Gmail’s email rule feature, you’ll be able to automatically allow your messages to be starred, deleted, marked as high-priority, or forwarded to another one of your email addresses.
Overall, this tool makes it easy to manage the messages you receive. If you want to learn more about this feature and how you can automate your inbox with it, keep reading the three steps below.
Step 1: Log into Gmail and Go to the ‘Filters’ Tab
To access Gmail’s email rule feature, log in to your account. Once you’re logged in and your account’s homescreen appears, navigate to the ‘Filters’ tab. This tab is located at the top of your screen in the ‘Search Mail’ box, which appears as a long gray tab with the phrase ‘Search Mail’ and a magnifying glass icon next to it. In this tab, you’ll see a filter icon on the far right, which looks like three lines drawn underneath one another.
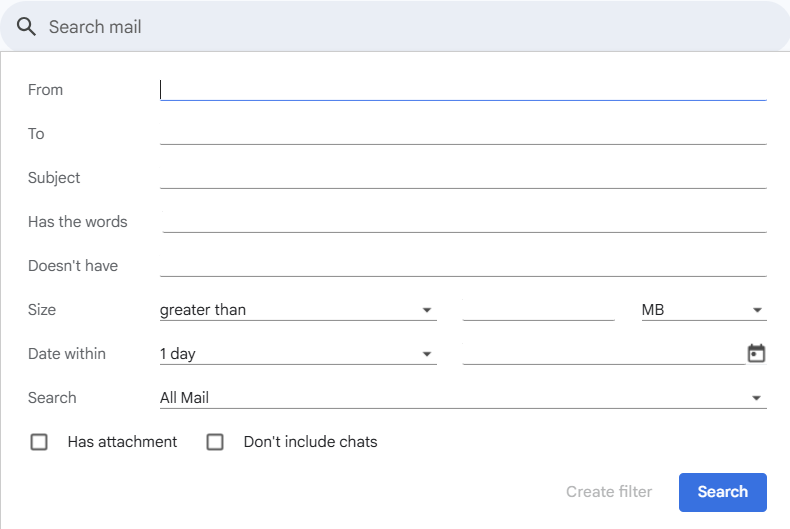
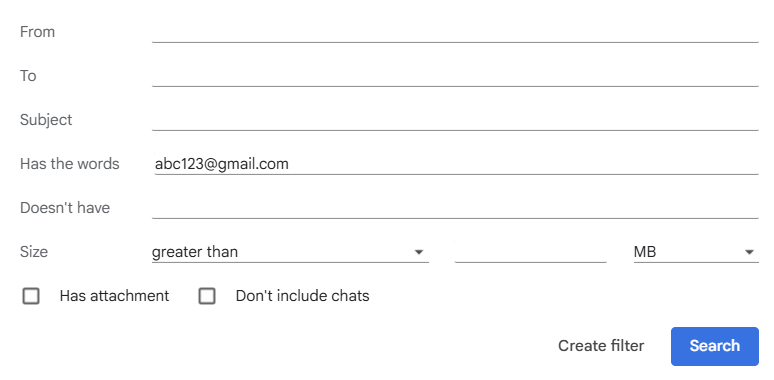
Then, click on the filters icon and a dropdown menu will appear with the following fields: ‘From,’ ‘To,’ ‘Subject,’ ‘Has the words,’ ‘Doesn’t have,’ ‘Size,’ ‘Date Within,’ ‘Search,’ as well as the optional checkbox features ‘Has attachment’ and ‘Don’t include chats.’ These fields will guide you as you create your Gmail email rules.
Step 2: Create Filter Rules
To create a search criterion, fill out the ‘From’ section of the form. Then, type out the email address you want the email filter rule to apply to. You can also include multiple email addresses by typing out each one and hitting the ‘Enter’ key on your computer to save it.
Next, fill out the ‘To’ section by including your email address. You can also include an alternative email address that you own, as long as it’s a Gmail email address as well. After filling out the ‘To’ field, then, add a subject line. Your subject line should reference the topic of the incoming emails.
The following line on the form will ask you to include keywords that align with said emails and their search criteria. Be sure to add keywords that are already included or that you expect to be featured in the filtered emails, like ‘due to,’ ‘confirmation,’ or ‘see attachment.’ Including these keywords will enhance your search criteria and filter them better.
In the ‘Doesn’t Have’ field, you’ll be prompted to add keywords from incoming emails that you want Gmail to ignore. By adding these keywords, Gmail will have a better understanding of filtering the emails you don’t want to have automated as part of your search criteria. After that, Gmail will then give you the option to filter your emails by size, which comes in handy if you’re expecting documents or attachments frequently.

The ‘Date Within’ tab on the form can be used to filter certain emails that are received within a specific time frame. This filter is helpful to apply when wanting to view incoming messages that are more important than others. Gmail gives you the option to filter your search criteria’s dates starting from one day within a specific date, and for up to a year. After making your selection, choose the particular date you want it to be filtered from by using the calendar dropdown to save it.
With the ‘search’ feature, you can tell Gmail to automatically send these emails to a specific section of your email, such as your inbox, drafts, spam, or trash folders. Underneath this line, the ‘Has attachment,’ and ‘Don’t Include Chats’ checkboxes allow you to filter emails that also include attachments as well as chat history conversations from the Google Talk platform.
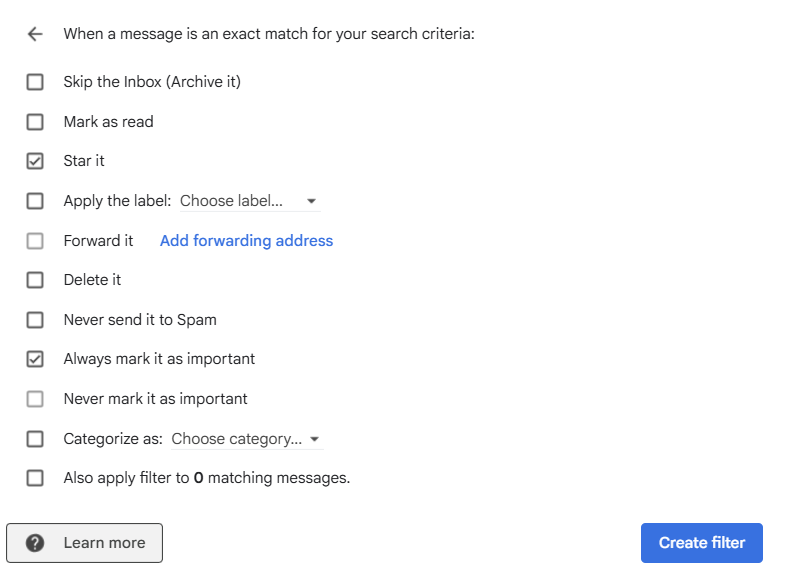
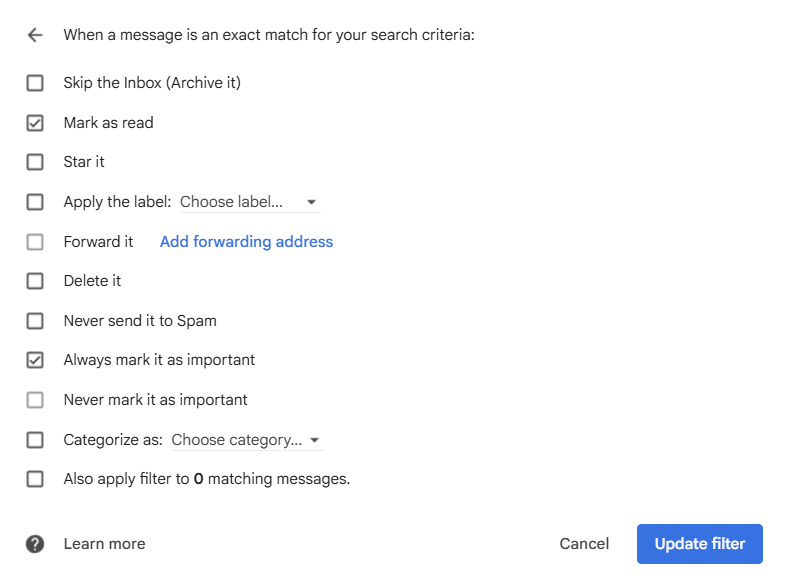
After filling out all the fields, click on the ‘Create Filter,’ option, and a different screen will appear. This pop-up will ask you to select what you want Gmail to do with your filtered emails when they arrive in the folder(s) you’ve already selected. You can choose to have it ‘Mark as Read,’ ‘Star It,’ ‘Forward It,’ or have Gmail delete the message entirely.
Step 3: Check Your Inbox
After creating and saving your search criteria, be sure to monitor your inbox to make sure your messages are still being filtered properly. As they come in, you can check to see if Gmail takes the right action with filtering them and make any updates if you notice any emails aren’t being filtered correctly.
Tips for Managing Your Filters and Search Criteria
With Gmail email rules, you can now filter and manage your incoming emails better, thanks to how it’s automated. You can also use these additional tips when setting up your new rules if you want to edit or delete them, or create a rule criterion that’s based on a specific email.
1. How to Edit Your Filters
If you want to edit a filter you’ve already created, go to the settings tab, which looks like a gear symbol, and is located on the upper right-hand side of your Gmail’s homescreen. Then, find the option that says ‘Filters and Blocked Addresses,’ in the horizontal menu. From there, you’ll be able to view and select the filters you want to change by clicking ‘Edit.’ After this is done, save the changes you’ve made by clicking ‘Continue,’ then ‘Update filter,’ and check your inbox to see if these updates were applied successfully when the next emails from your recipient come in.

2. How to Delete Filters
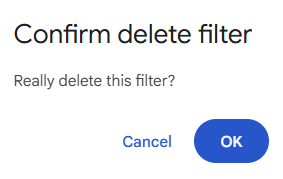
If you want to delete a filter you’ve already created, head back to the same ‘Filters and Blocked Addresses’ menu option in your Gmail settings tab. Then, click ‘Delete’ next to the filter you want to get rid of. Double-check that’s the filter you want to remove, since it can’t be recovered after deleting it. You can then check your inbox to make sure that Gmail doesn’t apply this filter to your email rules going forward.
3. How to Create a Filter Using a Specific Email
Gmail also gives you the option to create a filter by using a specific email. You can do this by opening the email you want filtered and selecting the three-dots icon on the right of the screen next to the ‘Reply To’ icon, which looks like an arrow. You can then choose the option, ‘Filter messages like this’ and fill out the search criteria by using the same steps as above. Sometimes, Gmail will autofill certain parts of your search criteria depending on the email’s contents, such as the email address it came from, the specific keywords it contains, and its subject line.
Take a look at our news on Business Technology